Florida Wall Flashing, Explained
Wall flashing is the quiet detail that decides whether a roof-to-wall junction stays dry or slowly rots the wall behind it. It is also one of the most common leak sources in a Florida home. Here is what wall flashing is, what properly installed wall flashing looks like versus a failure, and what a licensed contractor-inspector looks for at every roof-to-wall junction.
📘 Part of The Florida Home Inspection Guide
What wall flashing is
Wall flashing is the layered metal that seals the joint where a roof meets a wall, or where one wall material meets another. Water always finds the seam between two surfaces, and wall flashing is what carries that water back out onto the roof or the ground instead of into the structure. It is not caulk and it is not a sealant. Done right, wall flashing is a physical, overlapping barrier that works by gravity and layering, not by glue.
- Roof-to-wall flashing — seals where a sloped roof runs into a vertical wall.
- Step flashing — individual bent pieces woven into each course of shingles along that wall.
- Counterflashing — the upper piece that covers the top of the step flashing and ties into the wall.
- Kickout or diverter flashing — the piece at the bottom edge that throws water away from the wall.
- Z-metal drip edge — the bent trim that sheds water at horizontal transitions under siding.
Each of these is a type of wall flashing, and each has one job: keep water on the outside of the wall.
Why wall flashing is one of the most common leak sources in Florida homes
Florida is hard on wall flashing. The sun bakes it, wind-driven rain pushes water sideways under it, and the volume of afternoon storms means the roof-to-wall junction gets tested far more often than it would up north. When wall flashing fails, the water rarely announces itself. It runs down the back of the wall covering, into the wall cavity, and shows up as a stain, soft trim, or mold weeks later — often several feet from the actual leak.
That hidden path is why wall flashing is one of the leaks a home inspector watches most closely. A few reasons it ranks so high in Florida:
- The roof-to-wall junction is a transition, and transitions are where water concentrates.
- Many failures come from caulk used in place of real layered flashing.
- Missing kickout flashing dumps a roof’s worth of water directly into a wall.
- Humidity turns a small, slow leak into mold faster here than almost anywhere.
None of this means every home has a problem. It means wall flashing is worth a careful look on every inspection.
What properly installed wall flashing looks like — in photos
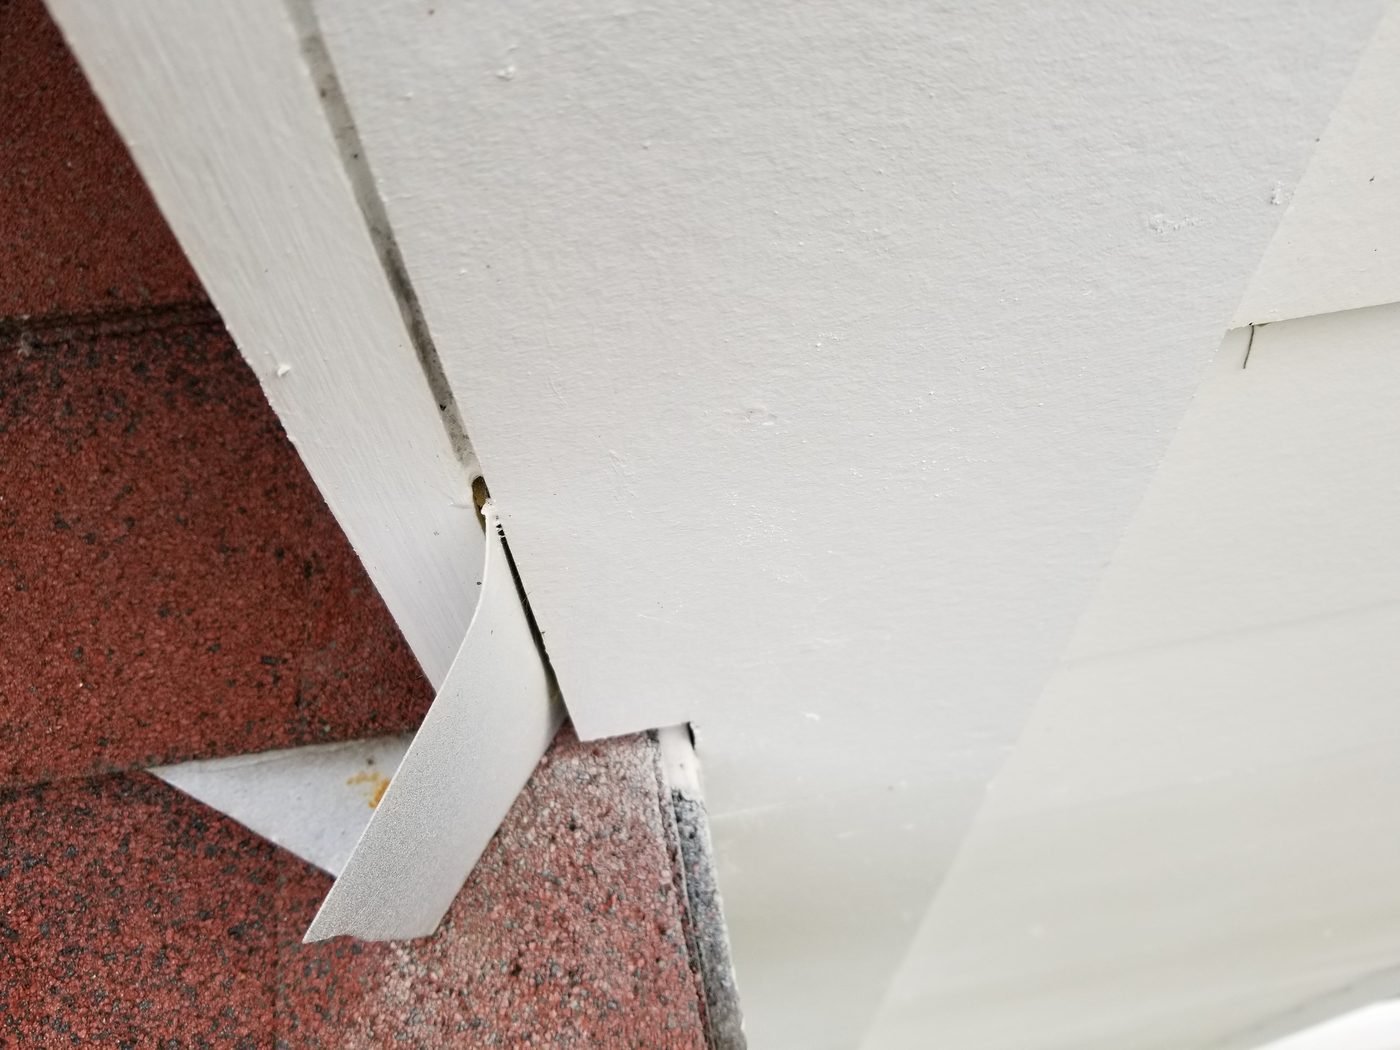
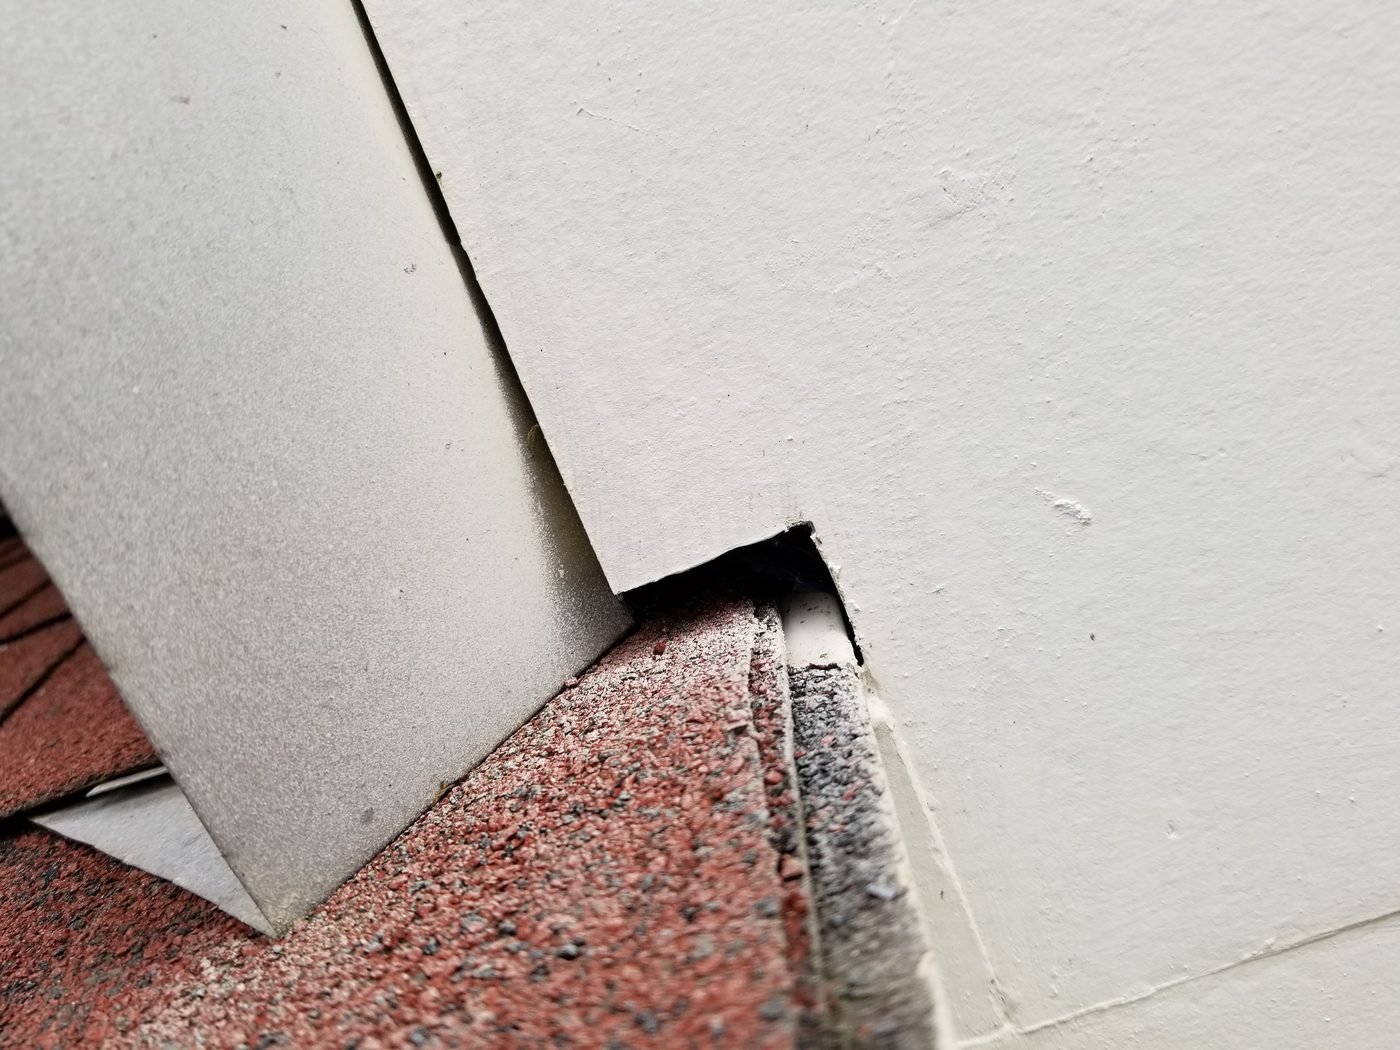
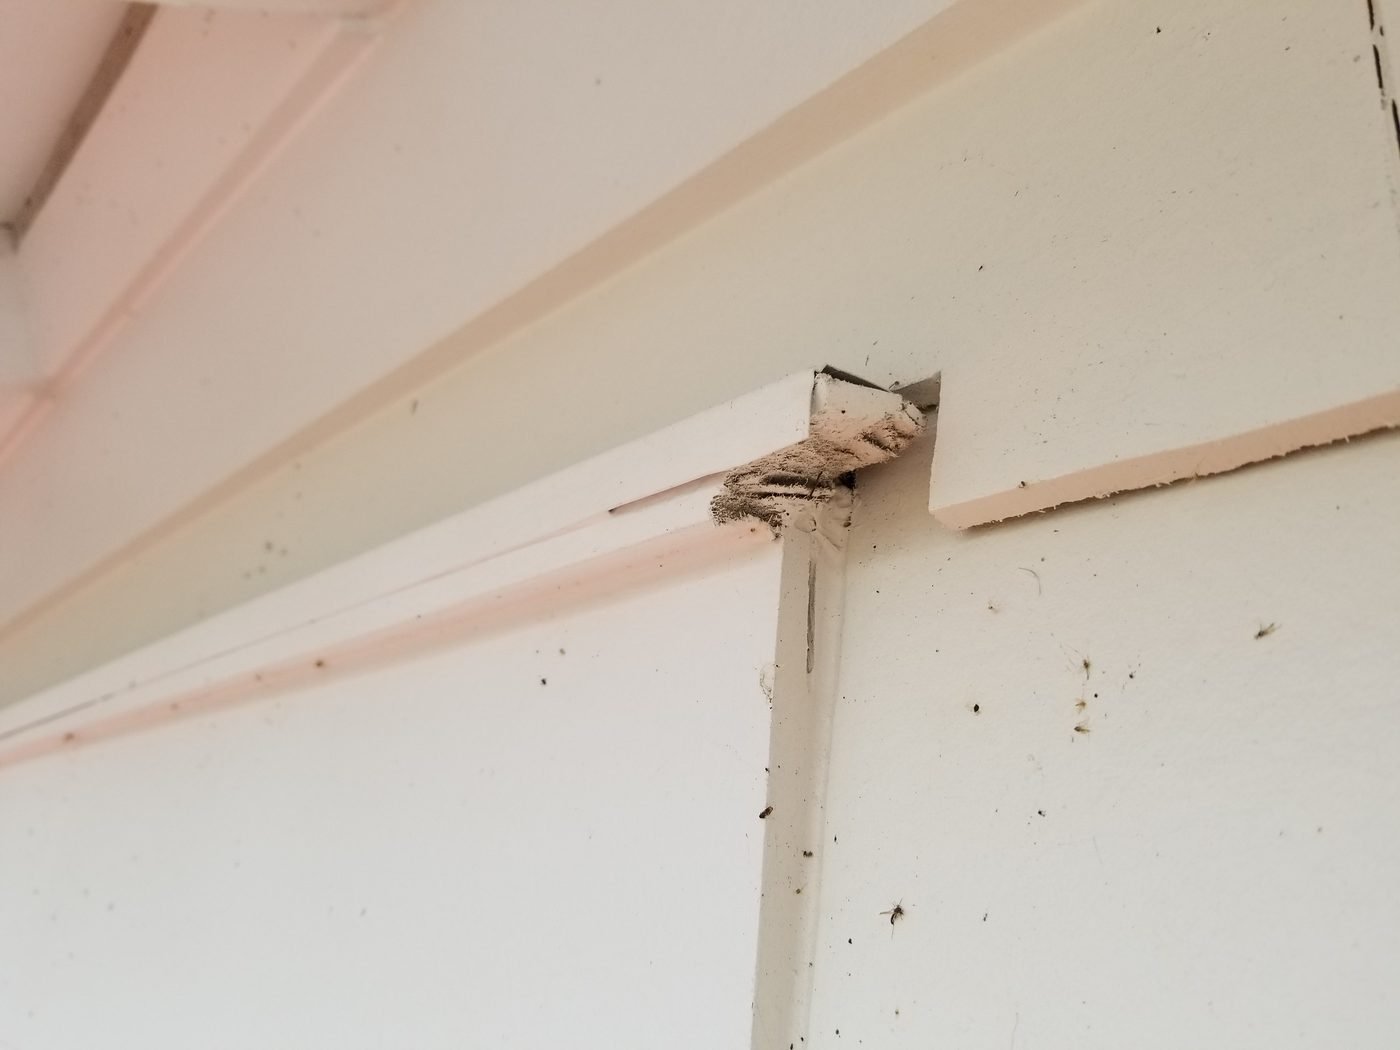
Words matter, but flashing is a detail you have to see. These are photos from Florida inspections showing what wall flashing looks like when it is installed correctly — the kind of detail a licensed roofing contractor (CCC1327217) documents when reading a roof-to-wall junction.
Step flashing vs. counterflashing
The most common roof-to-wall detail uses two pieces working together: step flashing and counterflashing. People mix up the terms, so here is the clean distinction.
Step flashing
Step flashing is a series of small L-shaped metal pieces, one woven into each course of shingles as the roof climbs the wall. Each piece laps over the one below it, so water stepping down the roof is always directed onto the shingle surface, never behind it. You should never see one long continuous strip here — that is a shortcut that traps water. Proper step flashing looks like a staircase of individual pieces.
Counterflashing
Counterflashing is the second layer. It tucks into or over the wall covering and laps down over the top of the step flashing, so the vertical seam is covered. On a masonry wall it is often set into a cut reglet; under siding it slips behind the wall covering. Together, step flashing and counterflashing form a two-part wall flashing system that no single piece of metal could replace.
Kickout and diverter flashing: the small piece that prevents big damage
The kickout is the smallest piece of wall flashing and one of the most important. It sits at the very bottom of a roof-to-wall junction, where the roof edge ends and the wall keeps going. Its job is to kick water away from the wall and into the gutter, instead of letting it sheet straight down behind the siding.
Missing or crushed kickout flashing is a classic Florida failure. Without it, every rainstorm funnels a concentrated stream of water into one spot on the wall. The damage is slow, hidden, and expensive — rotted sheathing, stained interior walls, and mold inside the cavity. A diverter does a similar job higher up, steering water around an obstruction. When a home inspector finds a stain low on a wall right below a roof edge, missing kickout flashing is one of the first suspects.
- Present and sized right — water lands in the gutter, the wall stays dry.
- Missing — a stream of roof runoff drives straight into the wall.
- Sealed with caulk only — a temporary patch that will fail again.
Z-metal drip edge under siding
Not all wall flashing is on the roof. Where one material stops and another begins on a vertical wall — for example, where cement fiber siding meets a band board, or where siding transitions above a window — a bent piece called Z-metal drip edge sheds water past the joint. The photo above of Z-metal under cement fiber siding shows the detail: the metal tucks up behind the upper course and folds down over the lower one, so water is carried out over the face instead of behind it.
It is a small detail that is easy to skip, and skipping it is a common source of hidden rot behind siding. Properly installed Z-metal, like properly installed wall flashing anywhere, works by layering: the upper material laps over the metal, the metal laps over the lower material, and gravity does the rest. When a home inspector sees siding butted tight to a horizontal band with no drip metal, that is a note worth making.
How wall flashing fails
Wall flashing rarely fails because the metal wears out. It fails because it was installed wrong, disturbed later, or replaced with sealant. The failures a home inspector sees again and again:
- Caulk instead of flashing — a bead of sealant smeared over a joint that needed layered metal. It looks fine for a season, then cracks.
- Reverse-lapped pieces — flashing installed so an upper piece tucks behind a lower one, guiding water inward.
- Missing kickout — the single most damaging omission at a roof-to-wall junction.
- Face-nailed flashing — nails driven through the exposed face, each one a future leak.
- Flashing buried by a re-side or re-roof — new work laid over old metal without re-integrating it.
The theme is the same across all of them: someone treated wall flashing as an afterthought instead of a layered system. Water is patient, and in Florida’s climate it does not take long to find the mistake.
What a home inspector looks for at wall flashing
On a Florida home inspection, the roof-to-wall junctions get specific attention because that is where so many leaks begin. A licensed inspector who has also installed this metal knows the difference between a cosmetic quirk and a real problem. Here is what draws the eye.
On the roof and wall
- Whether step flashing is present as individual woven pieces, not one long strip.
- Whether counterflashing actually laps over the step flashing.
- Whether a kickout is present where the roof edge meets the wall.
- Face nails, caulk-only repairs, and reverse laps.
Inside and below
- Stains, soft drywall, or bubbling paint on walls below a roof-to-wall junction.
- Soft or delaminated sheathing behind siding at the same spot.
- Moisture in the wall cavity where flashing should be shedding water.
An inspection is a visual assessment on the day, not a warranty. But careful attention to wall flashing catches many of the leaks that would otherwise surface months after closing.
Why wall flashing matters for buyers and insurance
For a buyer, wall flashing is one of those small details that carries outsized cost. A leak at a roof-to-wall junction can quietly rot sheathing and framing long before anyone sees a stain, and by the time it shows, the repair often means opening the wall. Catching a flashing problem during the inspection period turns it into a negotiation item instead of a first-year surprise.
Insurance cares too, indirectly. Carriers, including Citizens, weigh the roof and any evidence of water intrusion heavily when they decide whether to write or renew a policy. Active leaks and moisture damage are exactly the kind of finding that complicates coverage. A wall flashing problem documented and corrected is a smaller issue than one discovered during a claim. As always, an inspection reports condition; your insurer decides what any of it means for your policy. No honest inspector can promise how a carrier will read a given home.
How wall flashing connects to your other Florida inspections
Wall flashing does not sit in isolation. It shows up in several of the reports a Florida homeowner runs into, which is why it is worth understanding on its own.
- On a full home inspection, flashing at every roof-to-wall junction is part of the roof and exterior review.
- On a roof certification, flashing condition is one of the details that shapes the opinion on remaining roof life.
- On a 4-point inspection, evidence of active leaks at these junctions can affect how the roof is reported.
The Florida home inspection guide ties all of these reports together. If you want to see what is included on an inspection, the home inspection page lays it out, and every credential behind the work — HI4878, CBC059592, CCC1327217 — is verifiable at the Florida DBPR from the credentials page.
Wall Flashing FAQ: Questions Buyers and Owners Ask
Is wall flashing the same as caulk?
No, and that confusion causes real damage. Wall flashing is layered metal that sheds water by gravity. Caulk is a temporary sealant. Caulk smeared where flashing belongs will crack and leak, usually within a season or two.
Can wall flashing be repaired without tearing off the roof?
Sometimes. Localized flashing repairs are possible, especially for a missing kickout or damaged counterflashing. Whether a repair or a larger correction is right depends on how the surrounding roofing and siding are integrated, which a licensed contractor can scope after seeing it.
How do I know if my wall flashing is failing?
The usual signs are stains or soft drywall on walls below a roof-to-wall junction, bubbling paint, or mold near the base of a wall. Because water travels, the visible stain is often not directly under the leak. An inspection helps trace it back.
Will a flashing problem affect my insurance?
It can, indirectly. Active leaks and water damage are findings carriers weigh when writing or renewing. Documenting and correcting a wall flashing issue is far better than having it surface during a claim.
Worried about a leak at a roof-to-wall junction? Get a licensed eye on it.
A quick call is the fastest way to schedule an inspection of your roof-to-wall flashing.